Is There a Way to Make Smart Art Process Flows Not Have Bullet Points
This chapter is from the volume
Modifying and Formatting SmartArt Graphics
PowerPoint offers two contextual tabs that enable you lot to change the blueprint and format of your SmartArt graphics: the SmartArt Tools – Blueprint tab and the SmartArt Tools – Format tab.
Notation that these contextual tabs appear only when you have selected a graphic. If they disappear, select your graphic again to view them. Also, be enlightened that depending on your choice of SmartArt graphic, non all options are available on the SmartArt Tools tabs.
Using SmartArt Blueprint Tools
The SmartArt Tools – Pattern tab, every bit shown in Figure 11.6, enables you to create additional graphic objects, specify layout and way options, and convert your SmartArt graphic to other formats.

Figure 11.6. The SmartArt Tools – Design tab is i of two SmartArt Tools contextual tabs.
Adding a Shape to a SmartArt Graphic
Although SmartArt graphics already contain shapes by default, you tin can add together more shapes if you need. For example, you lot could create a basic bike graphic, which comes with five shapes, and so decide you demand to add together a sixth.
To add a shape to a SmartArt graphic, follow these steps:
- Select the SmartArt graphic to which you want to add a shape.
- On the SmartArt Tools – Design tab, click the down arrow to the right of the Add together Shape button to display a card of options.
- Select from the following carte choices:
- Add Shape Later—Add together an identical shape subsequently a selected shape.
- Add Shape Before—Add an identical shape before a selected shape.
- Add Shape Above—Add an identical shape in a higher place a selected shape.
- Add together Shape Below—Add an identical shape below a selected shape.
- Add Banana—Add an banana shape to an organization chart.
If you want to identify an additional shape in the default location for your graphic type (such as at the end of a list), you tin click the Add Shape button direct, without viewing the card options.
Calculation Bullets
If your SmartArt graphic supports bulleted lists, you can add a text bullet by clicking the Add together Bullet button on the SmartArt Tools – Design tab. You must select a specific graphic object for this button to get agile.
Using the Text Pane
Although y'all can enter text straight on your SmartArt graphic, using the Text pane is a proficient idea if y'all take a lot of text or your graphic is more circuitous.
To open the Text pane, click the Text Pane push on the SmartArt Tools – Design tab. Figure 11.seven shows a sample Text pane.
In this pane, you can enter and revise text, apply the buttons in the Create Graphic group to promote or demote objects, and edit whatever pictures if you selected a graphic blazon that includes pictures.
To close the Text pane, click the Close button (x) in the upper-right corner or click the Text Pane push on the SmartArt Tools – Design tab again, which acts as a toggle.
Organizing SmartArt Content
The Create Graphic grouping on the SmartArt Tools – Pattern tab (refer to Effigy 11.6) also includes several buttons that assistance you organize the content in your graphic. For example, you lot tin promote, demote, or reorder objects to customize your graphic exactly the style you want. Be enlightened that like other options on the SmartArt Tools – Design tab, the availability of these buttons depends on your graphic blazon and what object is selected.
The buttons include the following:
- Promote—Move selected object up a level. You tin too use this with the Text pane.
- Bench—Move selected object downwards a level. Yous can besides use this with the Text pane.
- Right to Left—Change layout from the right to the left.
- Move Up—Movement selected object up in a sequence.
- Move Down—Movement selected object down in a sequence.
- Layout—Modify the layout of an arrangement chart, such equally displaying subordinates to the left or to the right.
Modifying Your SmartArt Layout
The Layouts grouping on the SmartArt Tools – Design tab offers several layout options that y'all tin can apply to your SmartArt graphic. Three options appear on the tab itself, simply y'all tin click the downward arrow to the right of the group to open a gallery of additional options. Suspension the mouse over each pick to preview it on your slide. These layouts correspond to the layouts that appear on the Choose a SmartArt Graphic dialog box.
Changing SmartArt Colors
If you don't like your graphic'due south default colour scheme, y'all can rapidly change it by clicking the Change Colors push on the SmartArt Tools – Design tab. Figure 11.8 shows the gallery that displays, offer colour choices suited to your specific SmartArt graphic blazon.
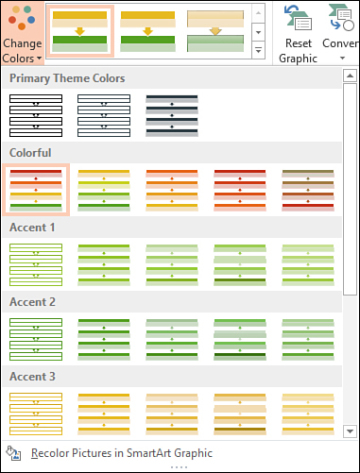
Figure eleven.eight. Get colorful by changing your SmartArt colors.
You can choose a primary theme color, select something more colorful, or opt for 1 of your theme'due south accent colors.
Applying a SmartArt Style
If you desire to apace dress upward your SmartArt graphic, apply 1 of the many ready-fabricated styles designed to complement your presentation's theme. To practice so, select a style in the SmartArt Styles group on the SmartArt Tools – Design tab. For more options, click the down arrow to display a gallery where you lot tin cull a style that's a adept match for your document, or try out a 3-D fashion.
Resetting a SmartArt Graphic
If you lot've made a lot of changes to your SmartArt graphic and make up one's mind you don't like what y'all've washed, click the Reset Graphic button on the SmartArt Tools – Pattern tab. PowerPoint deletes all the formatting changes y'all've made to your graphic and restores its original format. PowerPoint doesn't delete any text you've added, however.
Converting a SmartArt Graphic
If you make up one's mind that yous don't desire to use a SmartArt graphic you created simply would like to retain your text as a bulleted list, click the Convert button on the SmartArt Tools – Design tab and so select Convert to Text from the menu.
Some other option is to catechumen your SmartArt graphic to a shape and so that you can take advantage of shape-formatting options. To do this, click the Convert button and and then select Convert to Shapes from the menu. Learn more than in Affiliate 10, "Working with Shapes."
Formatting SmartArt Graphics
The SmartArt Tools – Format tab, equally shown in Figure 11.ix, offers numerous SmartArt formatting options, many of which are shared with other PowerPoint objects.

Figure 11.9. Create a custom look with the options on the SmartArt Tools – Format tab.
On this tab, y'all can perform the following tasks:
- Edit a iii-D graphic in 2-D.
- Format and alter individual SmartArt shapes.
- Apply shape mode, fills, outlines, and effects. Learn more in Affiliate x.
- Apply WordArt styles, fills, outlines, and effects to SmartArt text. Learn more than in Affiliate 4, "Working with Text."
- Arrange SmartArt objects, such every bit moving objects forrard and astern and adjustment, grouping, and rotating objects. Learn more in Chapter 5, "Formatting and Organizing Objects, Slides, and Presentations."
- Alter the height and width of your SmartArt graphic by clicking the Size button.
Editing in 2-D
If you applied a three-D fashion to your SmartArt graphic, y'all can temporarily render to ii-D to edit information technology past clicking the Edit in 2-D button on the SmartArt Tools – Format tab. When you cease editing, click this button again to render to your three-D fashion.
Changing the Appearance of SmartArt Shapes
Although SmartArt graphics include default shapes, you might prefer a different shape. For example, if you select a Basic Block List, your graphic includes several basic rectangles. Your preference, yet, might be rounded rectangles.
To change the appearance of the shapes in your SmartArt graphic, follow these steps:
- Select the shape or shapes yous want to change. To select multiple shapes, press the Ctrl key while clicking the shapes you want to change.
- On the SmartArt Tools – Format tab, click the Alter Shape push. A gallery of shape options appears, equally shown in Effigy 11.x.
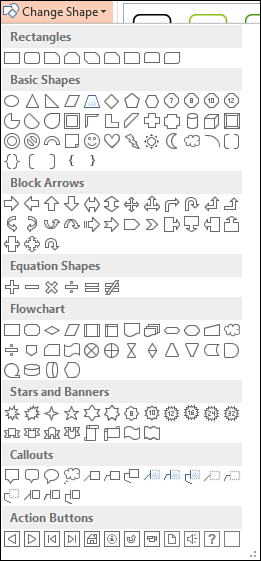
Figure 11.10. Select a new shape in this gallery.
- Select the shape choice y'all adopt to change your selected shapes.
Resizing Shapes
If you want to resize selected shapes on your graphic, click either the Larger or Smaller button on the SmartArt Tools – Format tab. You can continue clicking these buttons until you reach your desired size.
Source: https://www.informit.com/articles/article.aspx?p=2021720&seqNum=3
0 Response to "Is There a Way to Make Smart Art Process Flows Not Have Bullet Points"
Post a Comment